FAQ – Salt Internet Security macOS
Installation of Salt Internet Security
How do I install Salt Internet Security?
You will receive a welcome email from Salt with a link. This link will allow you to create an account on Salt Internet Security portal, please bookmark this page because it will be your configuration portal from now on for Salt Internet Security. On this portal you will find a link to download the software
Installing the software:
Before you start installing Salt Internet Security, make sure that:
- Your Computer is up to date. •
- You have logged in to your computer and have administrative rights.
- You have an internet connection.
Launch the downloaded installation package.
The Internet Security setup page opens.
Read the End User License Terms and, if you agree to the terms, select Accept and continue. While the installation package installs the product to your device, follow the instructions shown onscreen.
Once the installation is completed, you can see your protection status on the main page of the product.
Salt Internet Security notifies you if your browser extension is not yet in use. To add the browser extension, select Set up on the notification shown on the product main page and follow the instructions shown onscreen.
Note: If you don't see the browser extension notification, the extension is already in use.
Note: The product automatically detects the pre-selected language used by the computer and sets the product to use the same language.
Allow the product to complete the installation. The installation takes a minute or so (depending on the speed of your internet connection), and once installed, your computer is protected.
How do I uninstall Salt Internet Security?
The product cannot be uninstalled by moving the application to Trash. You need to use the product uninstaller to remove it from your computer.
You need rights to administer the computer to uninstall the product.
Follow these instructions:
- Open the folder where you installed the product. By default, the product is in the Applications folder.
- Double-click the Uninstall Salt Internet Security for Mac icon.
The uninstallation program opens. - Select Uninstall.
You need to enter your administrator password to uninstall the product. - Enter your administrator user name and password and select OK.
Note: After entering your credentials, the uninstallation may take some time to complete.
The product is removed from your computer.
Using Salt Internet Security
How do I view information about my subscription?
This section provides information related to your subscription.
To view information about your subscription:
- Open the product from the product icon in the menu bar.
- From the product menu, select Subscription.
The Subscription view opens.
On the view, you can see information about your current subscription and its status.
If you wish, you can also access your Salt Internet Security portal from this view.
How do I change the product settings?
The product settings, or preferences, can be accessed from the app menu and from the product icon in the menu bar.
If you quickly need to make changes to the product settings, you can access the product preferences by selecting first the product icon in the menu bar and then Preferences from the drop-down menu.
Apart from Preferences, the product icon menu includes the following options:
| Option | Description |
|---|---|
| Open Salt Internet Security | Opens the product. |
| Preferences... | changes to the product settings. |
| Virus and spyware scan | Scans every accessible file in the system for a complete antivirus check. |
| Choose what to scan... | Allows you to scan a specific folder in the system. |
| Check for updates | Checks and downloads the latest updates. |
| Infection report... | Opens a window listing all the infections found in the system. |
The menu also shows the protection status of your computer, the product version and information about the latest database update.
How do I see what Salt Internet Security has done?
The product main view shows the current protection status and other important information about the product.
In the top-right corner of the main view, you can see the status of your subscription.
When you place your mouse on the product icon in the menu bar, a notification is shown which indicates whether Virus protection and Browsing protection are active and whether all security features are up to date.
To make sure that the product has the latest updates:
- Select the product icon in the menu bar.
- Select Check for updates.
The product fetches the latest updates immediately.
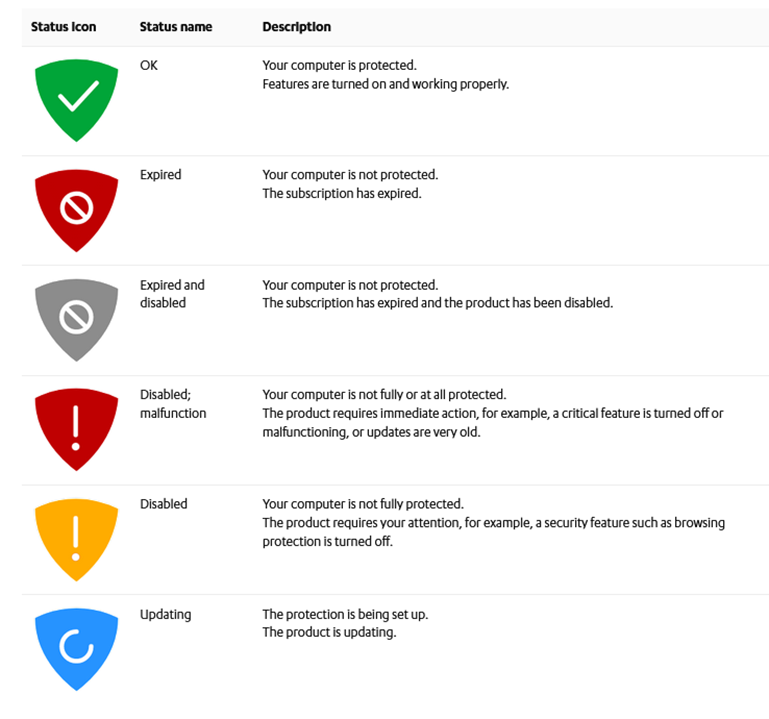
The protection status icon shows you the overall status of the product and its features.
The protection status icons:
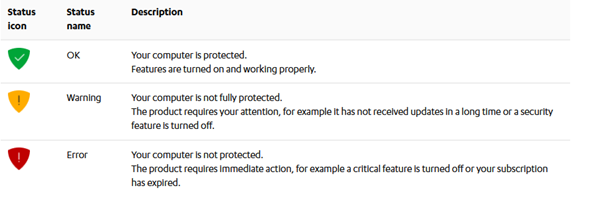
Examples of status messages that you may see:
- Google Chrome browser extension is not in use
- Mozilla Firefox browser extension is not in use
- Microsoft Edge browser extension is not in use
- Your subscription has expired
Protecting people & devices
How do I protect my devices?
This topic describes how to start protecting your own devices.
To set up protection for your own device:
- Open the product from the product icon in the menu bar.
- On the main view, select Manage in People & Devices.
- On the People & Devices view, select + Add device or user.
- Select My device > Continue.
- Select how you want to deliver the installation link to the device you want to protect and then select Send Link.
- Open the message with your device and select Install now.
- Select Download for Mac.
The installation package can now be found in the Downloads folder. - Double-click the downloaded installation package to launch it.
You will be guided through the steps to install the product. - Once the product setup window is displayed, select Accept and continue if you agree to the End User License Terms.
- When the installation is completed, log in to your account and select Continue to finalize the protection for the device.
Important: Browsing Protection requires browser extensions to be able to protect your web browsing, online banking and shopping, and to show you security information while you are browsing the internet. Therefore, make sure that the browser extensions are in use.
You have now set up protection for your own device. To view and manage the protection of the above device, go to the product's People & Devices view, or log in to your account to access the online management portal.
How do I protect my computer against harmful content?
Real-time scanning protects the computer by scanning all files when they are accessed and by blocking access to those files that contain malware.
When your computer tries to access a file, Real-time scanning scans the file for malware before it allows your computer to access the file.
If real-time scanning finds any harmful content, it puts the file to Trash before it can cause any harm.
Does real-time scanning affect the performance of my computer?
Normally, you do not notice the scanning process because it takes a small amount of time and system resources. The amount of time and system resources that real-time scanning takes depend on, for example, the contents, location and type of the file.
Files that take a longer time to scan:
- Files on removable drives such as CDs, DVDs, and portable USB drives.
- Compressed files, such as .zip files.
Real-time scanning may slow down your computer if:
- you have a computer that does not meet the system requirements;
- you access a lot of files at the same time. For example, when you open a directory that contains many files that need to be scanned.
How do I protect my device after receiving an invitation?
This topic describes how to start protecting your devices if you have received an invitation from your friend.
When your friend shares the protection with you, you'll receive an email in which you are invited to use their licenses to protect your PC, Mac, smartphone and tablet for free. We have already created an account for you, and you can find your account details in the message.
To start protecting your devices:
- Open the invitation email and read it through carefully. Take note of your account details.
- Select Start now.
Your account login page opens. - Enter your account login credentials sent to you in the invitation email and select Log in.
The Change your password window opens. - Create a new strong password for your account, select Change, and then select Continue.
Your online management portal opens. Start protecting your devices by selecting Add device to install the product to one of your devices.
You can now manage your own devices and their protection either through the online management portal or through the product's People & Devices view. As an invited user, you can manage your account as follows: •
- Protect more of your own devices if the subscription allows.
- You can change the name of the device being protected.
- You can release the license in use. Note that the subscription owner, or the person who invited you to share the protection, can remove your licenses at any time.
- You can leave the group at any time.
- You can make changes to your account settings, such as changing the account password and taking 2-step verification into use.
How do I share protection with someone?
This topic describes how to share the protection with a family member or a friend.
When you invite family members or friends to your group, the invited persons get their own user account that allows them to protect their devices using your licenses.
To share protection with someone else:
- Open the product from the product icon in the menu bar.
- On the main view, select Manage in People & Devices.
- On the People & Devices view, select + Add device or user.
- Select Someone else's device > Continue.
- To invite a user to your group:
- Enter the first name of the user.
- Enter the last name of the user.
- Enter the email address of the user.
- Select Send Invitation.
This person receives the invitation email and now has an account that allows them to protect their devices using your licenses. The users in your group won't see the devices or other details of other users or profiles in the group.
Note that if the person you want to invite to your group has already been added to your group or belongs to another Salt Internet Security group, you will see a message in the invitation dialog, saying that the person already belongs to your group or to another group. This means that the email address used in the invitation has already been activated for an Salt Internet Security account.
You can solve this either by using another email address, if any, to invite the user to your group or you can ask this user to delete the existing Salt Internet Security account after which you can then use the email address in the invitation.
Parental control
What is Family Rules?
With Family Rules, you can limit your children's daily and night time device use as well as their access to inappropriate content to prevent them from being exposed to undesirable material on the internet.
The internet is full of interesting websites, but you might not consider all content desirable or appropriate, especially for children. With the content filtering, you can ensure your children view only appropriate content on their devices by restricting what web pages they can access.
With the device use limits, you can schedule the time that your children can spend online. You can specify the daily device use times for weekdays and weekends separately. You can also limit the device use during night time for school nights and weekend nights.
Note: The Family Rules settings can be edited only on the parent's device or by logging in to the online management portal.
How do I protect my children’s devices?
This topic describes how to start protecting your child's device.
To set up protection for your child:
- Open the product from the product icon in the menu bar.
- On the main view, select Manage in People & Devices.
- On the People & Devices view, select + Add device or user.
- Select My child's device > Continue.
- Select how you want to deliver the installation link to the device you want to protect and then select Send Link.
- Open the message with your child's device and follow the instructions in the message to install the product on the device.
- Once the product setup window is displayed, select Accept and continue if you agree to the End User License Terms.
- When the installation is completed, confirm that you are setting up protection for a child profile by selecting Continue:
- Enter the name of your child.
- Select the age group your child belongs to.
- Select Next.
- Before you start setting up the Family Rules settings, discuss the family rules together with your child. Select Next.
- On the Daily time limits page, turn on Daily time limits to set the maximum number of hours that the child is allowed to use the device during weekdays and weekends:
- For weekdays, use the slider to change the maximum time allowed per day.
- For weekends, use the slider to change the maximum time allowed per day.
Note: If you do not want to limit the amount of time that the child spends on the device each day, drag the slider as far to the left as possible to set the allowed number of hours to Unlimited. - Select Next.
- On the Bedtime page, turn on Bedtime to prevent the use of the device during night time. You can set a different bedtime for school nights (from Sunday night to Thursday night) and weekend nights (from Friday night to Saturday night) as follows:
- For School nights, turn on the School nights setup pane.
- Drag the slider to set the time when the bedtime starts and ends.
- For Weekend nights, turn on the Weekend nights setup pane.
- Drag the slider to set the time when the bedtime starts and ends.
- Select Next.
- On the Content filtering page, turn on Content filtering to block the web content that you don't want your children to have access to:
- From the list of categories, select the web content you wish to block on all browsers.
- Select Next.
You have now set up protection for your child. To view and manage the above child profile, go to the product's People & Devices view on your own device, or log in to your account to access the online management portal.
Important: Browsing Protection requires browser extensions to be able to protect your web browsing, online banking and shopping, and to show you security information while you are browsing the internet. Therefore, make sure that the browser extensions are in use.
How do I make changes to the settings of an existing child profile?
At times you need to make changes to the family rule settings that you have set for a child.
As your children become older, you may need to change the age group they belong to. The time limits may also need some adjustments. Or you may not need the child profile any longer and want to remove it.
To edit the settings of a child profile:
- 1. Open the product from the product icon in the menu bar.
- On the main view, select Manage in People & Devices.
- On the People & Devices view, select the child profile you wish to edit.
On the Child profile view, you can add new devices as well as make changes to the existing devices, family rule and profile settings of the child. - On the Child profile view, select the device you want to edit, and on the Device view you can do the following:
- edit the device name
- release the license allocated for the device.
Note: You need to log in to your account to confirm the license release.
- On the Child profile view, you can immediately see which FAMILY RULES settings have been turned on and which are off. You can edit the following settings:
- App Control (Android only) o Daily Time Limits
- Bedtime o Content Filtering
- On the Child profile view, you can make the following changes to the Profile settings:
- edit the child's name
- move the child to another age group
- remove the child's profile
Note: You need to log in to your account to confirm the profile removal.
How do I edit app control settings?
This topic describes how to make changes to current App Control settings (Android only).
With App Control, you can select which apps are always allowed, which are limited by time limits, and which are always blocked on the child's devices. Calling and SMS messages are always allowed.
If you want to edit the App Control settings for your child's profile, do as follows:
- Open the product from the product icon in the menu bar.
- On the main view, select Manage in People & Devices.
- On the People & Devices view, select the child profile you wish to edit.
The Child profile view opens. - Under FAMILY RULES, select App Control.
The App Control view opens. If App Control is turned off, use the slider to turn it on. - To see a list of current devices which have the App Control feature, select Which devices App Control works on.
Note: App Control is supported only by devices running on Android. - Under DEFAULT SETTING, you can define how a newly installed app is treated by App Control:
- Time-limited - This means that the app use is restricted by daily time limits and bedtime limits.
- Always allowed - This means that the app use is not restricted by daily time limits nor bedtime limits.
- Always blocked - This means that the app cannot be used at all.
- Under ALL CURRENT APPS, you can see the apps that have already been installed on the device. For each app, you can select individually whether it's Time-limited, Always allowed or Always blocked.
- To save the changes, select SAVE.
The app or apps selected are now restricted by App Control.
How do I edit daily time limit settings?
This topic describes how to make changes to current daily device use times.
You can control when and for how long a child can use the device.
If you want to edit the daily time limit settings for your child's profile, do as follows:
- Open the product from the product icon in the menu bar.
- On the main view, select Manage in People & Devices.
- On the People & Devices view, select the child profile you wish to edit.
The Child profile view opens. - Under FAMILY RULES, select Daily Time Limits.
The Daily Time Limits view opens. If Daily Time Limits is turned off, use the slider to turn it on. - On the Daily Time Limits view, set the maximum number of hours that your child is allowed to use the device on weekdays and at weekends:
- For Weekdays, use the slider to change the maximum time allowed per day.
- For Weekends, use the slider to change the maximum time allowed per day.
Note: If you do not want to limit the amount of time that the child uses the device each day, drag the slider as far to the left as possible to set the allowed number of hours to Unlimited.
- To save the changes, select SAVE.
How do I edit bed time settings?
This topic describes how to make changes to current bedtime settings.
Use the bedtime setting to prevent the use of the device during night time. You can set a different bedtime for school nights—from Sunday night to Thursday night—and weekend nights—from Friday night to Saturday night.
If you want to edit the bedtime settings for your child's profile, do as follows:
- Open the product from the product icon in the menu bar.
- On the main view, select Manage in People & Devices.
- On the People & Devices view, select the child profile you wish to edit.
The Child profile view opens. - Under FAMILY RULES, select Bedtime.
The Bedtime view opens. If Bedtime is turned off, use the slider to turn it on. - On the Bedtime view, prevent the night time use of the device as follows:
- Turn on the School nights setup pane and drag the slider to set the time when bedtime starts and ends.
- Turn on the Weekend nights setup pane and drag the slider to set the time when bedtime starts and ends.
- To save the changes, select SAVE.
How do I edit content filtering settings?
This topic describes how to make changes to current content filtering settings.
You can keep your children safe from the many threats on the internet by limiting the types of content they can view while browsing the web.
You can block access to websites and pages that contain unsuitable content.
To select the types of web content to block on all browsers:
- 1. Open the product from the product icon in the menu bar.
- On the main view, select Manage in People & Devices.
- On the People & Devices view, select the child profile you wish to edit.
The Child profile view opens. - Under FAMILY RULES, select Content Filtering.
The Content Filtering view opens. If Content Filtering is turned off, use the slider to turn it on to block the content you don't want children to have access to. - Under BLOCKED CONTENT CATEGORIES, check that the content categories which you don't want your children to have access to are blocked.
Note: Click on the content category to see more detailed information about it. - When you are sure that you have selected all of the content categories that you want to block, select SAVE.
Scanning
How do I run a virus scan manually?
You can scan your entire computer to be completely sure that it has no harmful files or unwanted applications.
The full computer scan scans all internal and external hard drives for viruses, spyware, and potentially unwanted applications. It also checks for items that are possibly hidden by a rootkit. The full computer scan can take a long time to complete. You can also scan only the parts of your system that contain installed applications to find and remove unwanted applications and harmful items on your computer more efficiently.
Scanning files and folders
If you are suspicious of certain files on your computer, you can scan only those files or folders. These scans will finish a lot quicker than a scan of your whole computer. For example, when you connect an external hard drive or USB flash drive to your computer, you can scan it to make sure that they do not contain any harmful files.
You can scan a specific file or folder in the system.
You can manually scan files and folders if you suspect that they may contain malware.
To scan a file or folder manually:
- Select the product icon in the menu bar.
- Select Choose what to scan....
A window opens in which you can select what to scan. - Select the files or folders that you want to scan and then select Open.
The scan starts. When the scan is completed, you can see the scan result in the scan window.
If the product finds any malware during the scan, it shows the name and location of the detected malware, and moves the infected file to Trash automatically.
Tip: Empty Trash to remove the infected files permanently.
How do I block harmful websites?
The product protects you against harmful websites when browsing protection is turned on.
When browsing protection is on, it shows you safety ratings for web sites listed on search engine results and blocks harmful websites.
To turn on browsing protection:
- Select the product icon in the menu bar.
- Select Preferences.
Make sure that the Secure Browsing tab is open. - Select Turn on Browsing protection.
Note: Browsing protection requires that a browser extension is installed and turned on in the web browser that you use. The product normally installs the extension for Safari automatically, but you need to enable the extension before it works. The product supports also Firefox and Chrome, but you need to install and enable them manually.
How do I allow and block specific websites?
Browsing Protection automatically blocks access to websites that are rated harmful and may try to steal personal information.
You can manually block specific websites which you think are harmful, and allow automatically-blocked websites if you are sure they are safe.
To allow a website:
- Open the product from the product icon in the menu bar.
- On the main view, select Secure Browsing & Banking.
- On the Secure Browsing & Banking view, select Manage allowed and blocked websites.
- Select the lock icon in the bottom-left corner.
You need administrative rights to change these settings. - On the Secure Browsing tab, select Website exceptions.
The Website exceptions window opens. - Select +, enter the address of the website you want to allow and press Enter.
The website is added to the list of website exceptions.
Deepguard
What is DeepGuard?
DeepGuard monitors applications to detect potentially harmful changes to the system.
DeepGuard makes sure that you use only safe applications. The safety of an application is verified from the trusted cloud service. If the safety of an application cannot be verified, DeepGuard starts to monitor the application behavior.
By checking the file reputation, DeepGuard improves the detection of system compromises. It also makes sure that applications that do not respect privacy are prevented from using your webcam, installing new startup programs, taking control of other programs, eavesdropping on your internet connection, or other such activities that can affect your privacy.
To make sure that DeepGuard is active:
- Select the product icon in the menu bar.
- Select Preferences from the menu.
- Select the DeepGuard tab.
- Select the lock icon in the bottom-left corner. You need administrative rights to change the settings. Without this authorization, you cannot change any of the DeepGuard settings.
- Select DeepGuard.
- Select Let non-administrators save new rules if you want to apply new DeepGuard rules without using an administrator account.
- Select Use advanced mode for prompts if you want more options when DeepGuard asks you how to handle new applications. This allows you to create more detailed rules for handling specific applications or their access to certain files and folders on your computer. When DeepGuard detects a previously blocked or unknown application in advanced mode, select Details on the permission dialog to modify or adjust the rule for the application.
How do I allow applications DeepGuard has blocked?
If DeepGuard has blocked an application that you trust and want to allow, you can edit the rule for that application in the DeepGuard Configuration app.
Note: The rules that DeepGuard creates are not user-specific, so they are visible to everyone who uses the same computer. For example, most macOS apps use the /Applications folder to install apps, which are then available to all users of the computer. This means that any rules that DeepGuard applies to such apps have a system-wide effect.
To allow an application that DeepGuard has blocked:
- Select the product icon in the menu bar.
- Select Preferences from the menu.
- Select the DeepGuard tab.
- Select the lock icon in the bottom-left corner. You need administrative rights to change the settings. Without this authorization, you cannot change any of the DeepGuard settings.
- Select Advanced....
The DeepGuard Configuration app opens. - Select the lock icon in the bottom-left corner.
You need administrative rights to change the settings. Without this authorization, you cannot use the DeepGuard Configuration app. - In the DeepGuard Configuration app, right-click the rule for the application that you want to allow and select Edit.
- Select Allow as the Policy for the application.
- Select the permissions that you want to allow for the application.
- Select Save.
Banking Protection
How do I turn on banking protection (e-banking)?
Banking protection protects you against harmful activity when you access your online bank or make transactions online.
Banking protection automatically detects secure connections to recognized online banking websites, and notifies you when you visit any such site.
By default, Banking protection is enabled. If it is not enabled, turn on Banking protection in the following way:
- Select the product icon in the menu bar.
- Select Preferences from the menu.
- Select the Secure Browsing tab.
- Select the lock icon in the bottom-left corner. You need administrative rights to change these settings.
- Select Turn on Banking protection.
Note: Banking protection requires that browser extensions are in use.