FAQ – Salt Internet Security Windows
Installation of Salt Internet Security
How do I install Salt Internet Security?
You will receive a welcome email from Salt with a link. This link will allow you to create an account on Salt Internet Security portal, please bookmark this page because it will be your configuration portal from now on for Salt Internet Security. On this portal you will find a link to download the software
Installing the software:
Before you start installing Salt Internet Security, make sure that:
- Your Computer is up to date. •
- You have logged in to your computer and have administrative rights.
- You have an internet connection.
Launch the downloaded installation package.
The Internet Security setup page opens.
Read the End User License Terms and, if you agree to the terms, select Accept and continue. While the installation package installs the product to your device, follow the instructions shown onscreen.
Once the installation is completed, you can see your protection status on the main page of the product.
Salt Internet Security notifies you if your browser extension is not yet in use. To add the browser extension, select Set up on the notification shown on the product main page and follow the instructions shown onscreen.
Note: If you don't see the browser extension notification, the extension is already in use.
Note: The product automatically detects the pre-selected language used by the computer and sets the product to use the same language.
Allow the product to complete the installation. The installation takes a minute or so (depending on the speed of your internet connection), and once installed, your computer is protected.
How do I uninstall Salt Internet Security?
The way of uninstalling a program from your computer depends on the version of the Windows operating system. In this topic, we describe one uninstallation method for the Windows versions that are supported by our product.
To uninstall Salt Home Security on Windows 10 and 11:
- Select Start and search for Salt Home Security 2.
- Once you find it, right-click on it and select Uninstall. Control Panel opens. 3.
- Select Uninstall. If prompted, enter your administrator credentials.
To uninstall Salt Internet Security on Windows 7 and 8:
- Select Start, then go to Control Panel.
- Select Uninstall a program or Programs and Features, depending on your view.
- In Programs and Features, scroll down to the product and click on it to highlight it.
- Select Uninstall.
- Select Yes to confirm the uninstallation.
- If asked, restart your computer.
Note: When you uninstall Salt Home Security from your computer, remember also to release its license from your Salt Internet Security portal only then can you reuse the released license on another computer.
Using Salt Internet Security
How do I view information about my subscription?
To view information about your subscription:
- Open Salt Internet Security from the Windows Start menu.
- On the main view, select the menu button.
- Select Subscription.
The view shows statistical data on how your device and your browsing have been protected.
If you wish, you can also access your Salt Internet Security portal from this view.
How do I change the product settings?
You can control how the product behaves by changing its settings.
Note that you need administrative rights to change the product settings. Some product settings can be accessed from the tray icon context menu.
You can access the tools that you can use to protect your computer via the Viruses and Threats and Secure Browsing and Banking sections.
Some product settings can be accessed from the tray icon context menu.
To open the tray icon context menu, follow these instructions:
- Right-click the product icon on the Windows taskbar.
Note: If the product icon is hidden, click the Show hidden icons arrow in the taskbar first. - The context menu includes the following options:
| Option | Description |
|---|---|
| Link to the online portal | Check for updates |
| Opens the portal where you can manage your account. | Checks and downloads the latest updates. |
| View recent events | Shows the actions that the product has taken to protect your computer. |
| Open settings | Opens the product settings. |
| About | Shows the version information of the product. |
How do I turn off all security features?
You can turn off all of the security features if you need to free up more system resources.
Note: You need administrative rights to turn off the security features.
Note: Your computer is not fully protected when you turn off the security features.
- Open Salt Internet Security from the Windows Start menu.
- On the main view, select Viruses & Threats.
- Select Turn off all protection
The features are automatically turned back on the next time you restart your computer. You can also turn them on manually on the main view of the product.
How do I see what Salt Internet Security has done?
The protection status icon shows you the overall status of the product and its features.
The protection status icons:
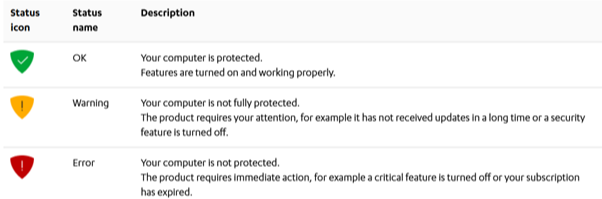
Examples of status messages that you may see:
- Google Chrome browser extension is not in use
- Mozilla Firefox browser extension is not in use
- Microsoft Edge browser extension is not in use
- Your subscription has expired
How do I view protection statistics?
The product shows you a rotating counter of protection statistics on the Subscription page.
Note: This feature may not be included in your version of the product.
Open Salt Internet Security from the Windows Start menu.
- On the main view, select the menu button.
- Select Subscription.
On the Subscription page, you can see how the product has protected both your device and your browsing.
| Statistic | Description |
|---|---|
| Downloads verified to be safe | The number of files that the product has scanned in incoming internet traffic, before they are stored on your computer. In addition to files that you download through your web browser, this also includes files that are downloaded in the background, for example update packages that the browser downloads automatically. |
| Files checked in the background | The number of files that the product has scanned. This total includes the statistics for all user accounts on this computer. Note: This includes duplicate scans, so for example, if the product scans the same file twice, this total increases by two. |
| View recent events | Shows the actions that the product has taken to protect your computer. |
| Banking sessions secured | The number of banking sessions that the product has secured. The number increases each time Banking Protection activates when you access an online banking website. |
| Websites checked | The number of websites that you have visited where the product has checked the site's reputation. |
| Potentially harmful files blocked | The number of harmful, potentially unwanted, and unwanted files that the product has blocked. This does not include downloaded files that the product has blocked before they are stored on the computer. This total includes the statistics for all user accounts on this computer. Note: If the product blocks the same file twice, for example, this total increases by two. |
| Harmful websites blocked | The number of harmful websites that the product has blocked. |
How do I view the event history?
You can see what the product has done and how it has protected your computer on the Event history page.
The event history shows you various events for the Salt Internet Security app and details of the protective measures that the it has taken. For example, it shows you all the harmful items that have been detected and either cleaned or quarantined.
On the main view of the product, you can see the most recent events related to the product.
To see your product's entire event history: 1.
- Open Salt Internet Security from the Windows Start menu. 2.
- In the lower right corner of the product's main view, select View full timeline.
The Event history page opens.
The event history shows you the time and description of each event. Depending on the type of event, you can click the event to see more details for it. For example, for harmful files you can see the following information:
- Date and time when the harmful file was found
- The name of the malware and its location on your computer
- The performed action
You can view and manage the applications and files that the product blocks in the App and file control view.
To access the App and file control view:
- Open Salt Internet Security from the Windows Start menu.
- Select Viruses and Threats.
- Select App and file control.
The App and file control view opens, including four separate tabs:
Quarantined
Quarantine is a safe repository for files that may be harmful. The product can place both harmful items and potentially unwanted applications in quarantine to make them harmless. You can restore applications or files from the quarantine later if you need them. If you do not need a quarantined item, you can delete it. Deleting an item in the quarantine removes it permanently from your computer.
Blocked
This tab shows you the applications that DeepGuard has blocked. DeepGuard blocks the applications that it monitors when they behave suspiciously or try to connect to the internet.
Excluded
This tab shows you the applications, files, and folders that are excluded from scanning. DeepGuard does not block any excluded applications from running, and the product does not scan any excluded locations for harmful items. You can exclude both folders and individual files.
Protected
This tab shows you the folders that are protected against destructive software, such as ransomware. The product blocks any unsafe applications from making changes to the files stored in these folders.
How do I change the notifications settings?
This topic gives instructions on how to change which notifications are shown.
- On the main view, select the menu button.
- Select Settings.
- Select Notifications.
- Select or clear Show useful tips and updates.
When this setting is on, the product shows notifications about news, tips, and special offers. Critical product notifications are always shown even when this setting is not selected.
How to I prevent applications from downloading harmful files?
You can prevent applications on your computer from downloading harmful files from the internet.
Some websites contain exploits and other harmful files that may harm your computer. With advanced network protection, you can prevent any application from downloading harmful files before they reach your computer.
To block any application from downloading harmful files:
- Open Salt Internet Security from the Windows Start menu.
- On the main view, select Viruses & Threats.
- On the Viruses and Threats view, select Settings.
- Select Edit settings.
Note: You need administrative rights to change the settings. - Turn on Web Traffic Scanning.
Note: This setting is effective even if you turn off the firewall.
Gaming Mode
How do I use the gaming mode?
This topic provides information about the product's gaming mode.
The automatic gaming mode requires that you have Windows 10 version 1809 («October 2018 Update») or later running on your computer.
The gaming mode is enabled in the app by default. As soon as the product detects that you are running a game on your computer, it automatically stops all scheduled scans and suspends product and database updates. This reduces the product's impact on your computer and network use. It frees up more system resources for computer games while still maintaining the essential functionality of the product. The gaming mode turns off automatically when you stop playing the game.
Note: If you switch from the game to another open app on your computer for more than 60 seconds by using the Alt+Tab key combination, the app assumes that you have stopped playing the game and turns the gaming mode off.
If you don't want the gaming mode to turn on automatically, turn it off in the following way:
- Open Salt Internet Security from the Windows Start menu.
- On the main view, select the menu button.
- Select Settings > Scanning settings.
- Select Edit settings.
Note: You need administrative rights to change the settings. - Turn off gaming mode.
Now the gaming mode will not turn on automatically.
Note: On the Settings view, you can see the last time when the gaming session was started.
What do I do if the gaming mode does not start with my game?
This topic instructs what to do if the gaming mode fails to start on Windows.
By default, the gaming mode is activated when Windows detects that a game is started. Sometimes, however, Windows may fail to recognize a game, and the gaming mode will not activate. If this occurs, you can manually add detection for that particular game in the Xbox Game Bar in the following way:
- Launch the game. 2.
- Press Windows key + G. The Game Bar opens. 3.
- From the Game Bar, select Settings > General and select then the Remember this is a game checkbox.
Note: If you don't see the setting, Game Bar already recognizes the game.
From now on, the product will always activate the gaming mode as soon as you launch the game.
Note: You can use this setting with games bought from any games store.
Protecting people & devices
How do I protect my devices?
This topic describes how to start protecting your own devices.
To set up protection for your own device:
- Open Salt Internet Security from the Windows Start menu.
- On the main view, select Manage in People & Devices.
- On the People & Devices view, select + Add device or user.
- Select My device > Continue.
- Select how you want to deliver the installation link to the device you want to protect and then select Send Link.
- Open the message with your device and select Install now.
- Select Download for Windows PC to download the product installer.
- Launch the installer. You need administrative rights to start the installation.
- Once the product setup window is displayed, select Accept and continue if you agree to the End User License Terms.
- When the installation is completed, log in to your account, if prompted, and select Continue to finalize the protection for the device.
Important: Browsing Protection requires browser extensions to be able to protect your web browsing, online banking and shopping, and to show you security information while you are browsing the internet. Therefore, make sure that the browser extensions are in use.
You have now set up protection for your own device. To view and manage the protection of the above device, go to the product's People & Devices view, or log in to your account to access the online management portal.
How do I protect my computer against harmful content?
The product protects the computer from programs that may steal personal information, damage the computer, or use it for illegal purposes.
By default, the virus protection handles all harmful files as soon as it finds them so that they can cause no harm.
The product automatically scans your local hard drives, any removable media (such as portable drives or DVDs), and any content that you download.
The product also watches your computer for any changes that may suggest that you have harmful files on your computer. When the product detects any dangerous system changes, for example changes in system settings or attempts to change important system processes, its DeepGuard component stops the application from running as it can be harmful.
Keep real-time scanning turned on to remove harmful files from your computer before they can harm it.
We recommend that you keep Virus protection turned on all the time. You can also scan files manually and set up scheduled scans if you want to make sure that there are no harmful files on your computer or to scan files that you have excluded from the real-time scan.
To make sure that real-time scanning is on:
- Open Salt Internet Security from the Windows Start menu.
- On the main view, select Viruses & Threats.
- On the Viruses and Threats view, select Settings.
- Select Edit settings.
- Turn on Virus Protection.
Real-time scanning protects the computer by scanning all files when they are accessed and by blocking access to those files that contain malware.
When your computer tries to access a file, Real-time scanning scans the file for malware before it allows your computer to access the file.
If Real-time scanning finds any harmful content, it puts the file to quarantine before it can cause any harm.
Does real-time scanning affect the performance of my computer?
Normally, you do not notice the scanning process because it takes a small amount of time and system resources. The amount of time and system resources that real-time scanning takes depend on, for example, the contents, location and type of the file.
Files on removable drives such as CDs, DVDs, and portable USB drives take a longer time to scan.
Note: Compressed files, such as .zip files, are not scanned by real-time scanning.
Real-time scanning may slow down your computer if:
- you have a computer that does not meet the system requirements;
- you access a lot of files at the same time. For example, when you open a directory that contains many files that need to be scanned.
How do I protect my device after receiving an invitation?
This topic describes how to start protecting your devices if you have received an invitation from your friend.
When your friend shares the protection with you, you'll receive an email in which you are invited to use their licenses to protect your PC, Mac, smartphone and tablet for free. We have already created an account for you, and you can find your account details in the message.
To start protecting your devices:
- Open the invitation email and read it through carefully. Take note of your account details.
- Select Start now.
Your account login page opens. - Enter your account login credentials sent to you in the invitation email and select Log in.
The Change your password window opens. - Create a new strong password for your account, select Change, and then select Continue.
Your online management portal opens. Start protecting your devices by selecting Add device to install the product to one of your devices.
You can now manage your own devices and their protection either through the online management portal or through the product's People & Devices view. As an invited user, you can manage your account as follows: •
- Protect more of your own devices if the subscription allows.
- You can change the name of the device being protected.
- You can release the license in use. Note that the subscription owner, or the person who invited you to share the protection, can remove your licenses at any time.
- You can leave the group at any time.
- You can make changes to your account settings, such as changing the account password and taking 2-step verification into use.
How do I share protection with someone?
This topic describes how to share the protection with a family member or a friend.
When you invite family members or friends to your group, the invited persons get their own user account that allows them to protect their devices using your licenses.
To share protection with someone else:
- Open Salt Internet Security from the Windows Start menu.
- On the main view, select Manage in People & Devices.
- On the People & Devices view, select + Add device or user.
- Select Someone else's device > Continue.
- To invite a user to your group:
- Enter the first name of the user.
- Enter the last name of the user.
- Enter the email address of the user.
- Select Send Invitation.
This person receives the invitation email and now has an account that allows them to protect their devices using your licenses. The users in your group won't see the devices or other details of other users or profiles in the group.
Note that if the person you want to invite to your group has already been added to your group or belongs to another Salt Internet Security group, you will see a message in the invitation dialog, saying that the person already belongs to your group or to another group. This means that the email address used in the invitation has already been activated for an Salt Internet Security account.
You can solve this either by using another email address, if any, to invite the user to your group or you can ask this user to delete the existing Salt Internet Security account after which you can then use the email address in the invitation.
Parental control
What is Family Rules?
With Family Rules, you can limit your children's daily and night time device use as well as their access to inappropriate content to prevent them from being exposed to undesirable material on the internet.
The internet is full of interesting websites, but you might not consider all content desirable or appropriate, especially for children. With the content filtering, you can ensure your children view only appropriate content on their devices by restricting what web pages they can access.
With the device use limits, you can schedule the time that your children can spend online. You can specify the daily device use times for weekdays and weekends separately. You can also limit the device use during night time for school nights and weekend nights.
Note: The Family Rules settings can be edited only on the parent's device or by logging in to the online management portal.
How do I protect my children’s devices?
To set up protection for your child:
- Open Salt Internet Security from the Windows Start menu.
- On the main view, select Manage in People & Devices.
- On the People & Devices view, select + Add device or user.
- Select My child's device > Continue.
- Select how you want to deliver the installation link to the device you want to protect and then select Send Link.
- Open the message with your child's device and follow the instructions in the message to install the product on the device.
- Once the product setup window is displayed, select Accept and continue if you agree to the End User License Terms.
- When the installation is completed, confirm that you are setting up protection for a child profile by selecting Continue:
- Enter the name of your child.
- Select the age group your child belongs to.
- Select Next.
- Before you start setting up the Family Rules settings, discuss the family rules together with your child. Select Next
- On the Daily time limits page, turn on Daily time limits to set the maximum number of hours that the child is allowed to use the device during weekdays and weekends:
- For weekdays, use the slider to change the maximum time allowed per day.
- For weekends, use the slider to change the maximum time allowed per day.
Note: If you do not want to limit the amount of time that the child spends on the device each day, drag the slider as far to the left as possible to set the allowed number of hours to Unlimited. - Select Next.
- On the Bedtime page, turn on Bedtime to prevent the use of the device during night time. You can set a different bedtime for school nights (from Sunday night to Thursday night) and weekend nights (from Friday night to Saturday night) as follows:
- For School nights, turn on the School nights setup pane.
- Drag the slider to set the time when the bedtime starts and ends.
- For Weekend nights, turn on the Weekend nights setup pane.
- Drag the slider to set the time when the bedtime starts and ends.
- Select Next.
- On the Content filtering page, turn on Content filtering to block the web content that you don't want your children to have access to:
- From the list of categories, select the web content you wish to block on all browsers.
- Select Next.
You have now set up protection for your child. To view and manage the above child profile, go to the product's People & Devices view on your own device, or log in to your account to access the online management portal.
Important: Browsing Protection requires browser extensions to be able to protect your web browsing, online banking and shopping, and to show you security information while you are browsing the internet. Therefore, make sure that the browser extensions are in use.
How do I make changes to the settings of an existing child profile?
At times you need to make changes to the family rule settings that you have set for a child.
As your children become older, you may need to change the age group they belong to. The time limits may also need some adjustments. Or you may not need the child profile any longer and want to remove it.
To edit the settings of a child profile:
- Open Salt Internet Security from the Windows Start menu.
- On the main view, select Manage in People & Devices.
- On the People & Devices view, select the child profile you wish to edit.
On the Child profile view, you can add new devices as well as make changes to the existing devices, family rule and profile settings of the child. - On the Child profile view, select the device you want to edit, and on the Device view you can do the following:
- edit the device name
- release the license allocated for the device.
Note: You need to log in to your account to confirm the license release.
- On the Child profile view, you can immediately see which FAMILY RULES settings have been turned on and which are off. You can edit the following settings:
- App Control (Android only) o Daily Time Limits
- Bedtime o Content Filtering
- On the Child profile view, you can make the following changes to the Profile settings:
- edit the child's name
- move the child to another age group
- remove the child's profile
Note: You need to log in to your account to confirm the profile removal.
How do I edit app control settings?
This topic describes how to make changes to current App Control settings (Android only).
With App Control, you can select which apps are always allowed, which are limited by time limits, and which are always blocked on the child's devices. Calling and SMS messages are always allowed.
If you want to edit the App Control settings for your child's profile, do as follows:
- Open Salt Internet Security from the Windows Start menu.
- On the main view, select Manage in People & Devices.
- On the People & Devices view, select the child profile you wish to edit.
The Child profile view opens. - Under FAMILY RULES, select App Control.
The App Control view opens. If App Control is turned off, use the slider to turn it on. - To see a list of current devices which have the App Control feature, select Which devices App Control works on.
Note: App Control is supported only by devices running on Android. - Under DEFAULT SETTING, you can define how a newly installed app is treated by App Control:
- Time-limited - This means that the app use is restricted by daily time limits and bedtime limits.
- Always allowed - This means that the app use is not restricted by daily time limits nor bedtime limits.
- Always blocked - This means that the app cannot be used at all.
- Under ALL CURRENT APPS, you can see the apps that have already been installed on the device. For each app, you can select individually whether it's Time-limited, Always allowed or Always blocked.
- To save the changes, select SAVE.
The app or apps selected are now restricted by App Control.
How do I edit daily time limit settings?
This topic describes how to make changes to current daily device use times.
You can control when and for how long a child can use the device. If you want to edit the daily time limit settings for your child's profile, do as follows:
- Open Salt Internet Security from the Windows Start menu.
- On the main view, select Manage in People & Devices.
- On the People & Devices view, select the child profile you wish to edit.
The Child profile view opens. - Under FAMILY RULES, select Daily Time Limits.
The Daily Time Limits view opens. If Daily Time Limits is turned off, use the slider to turn it on. - On the Daily Time Limits view, set the maximum number of hours that your child is allowed to use the device on weekdays and at weekends:
- For Weekdays, use the slider to change the maximum time allowed per day.
- For Weekends, use the slider to change the maximum time allowed per day.
Note: If you do not want to limit the amount of time that the child uses the device each day, drag the slider as far to the left as possible to set the allowed number of hours to Unlimited.
- To save the changes, select SAVE.
How do I edit bed time settings?
This topic describes how to make changes to current bedtime settings.
Use the bedtime setting to prevent the use of the device during night time. You can set a different bedtime for school nights—from Sunday night to Thursday night—and weekend nights—from Friday night to Saturday night.
If you want to edit the bedtime settings for your child's profile, do as follows:
- Open Salt Internet Security from the Windows Start menu.
- On the main view, select Manage in People & Devices.
- On the People & Devices view, select the child profile you wish to edit.
The Child profile view opens. - Under FAMILY RULES, select Bedtime.
The Bedtime view opens. If Bedtime is turned off, use the slider to turn it on. - On the Bedtime view, prevent the night time use of the device as follows:
- Turn on the School nights setup pane and drag the slider to set the time when bedtime starts and ends.
- Turn on the Weekend nights setup pane and drag the slider to set the time when bedtime starts and ends.
- To save the changes, select SAVE.
How do I edit content filtering settings?
This topic describes how to make changes to current content filtering settings.
You can keep your children safe from the many threats on the internet by limiting the types of content they can view while browsing the web.
You can block access to websites and pages that contain unsuitable content.
To select the types of web content to block on all browsers:
- Open Salt Internet Security from the Windows Start menu.
- On the main view, select Manage in People & Devices.
- On the People & Devices view, select the child profile you wish to edit.
The Child profile view opens. - Under FAMILY RULES, select Content Filtering.
The Content Filtering view opens. If Content Filtering is turned off, use the slider to turn it on to block the content you don't want children to have access to. - Under BLOCKED CONTENT CATEGORIES, check that the content categories which you don't want your children to have access to are blocked.
Note: Click on the content category to see more detailed information about it. - When you are sure that you have selected all of the content categories that you want to block, select SAVE.
Scanning
How do I run a virus scan manually?
You can scan your entire computer to be completely sure that it has no harmful files or unwanted applications.
The full computer scan scans all internal and external hard drives for viruses, spyware, and potentially unwanted applications. It also checks for items that are possibly hidden by a rootkit. The full computer scan can take a long time to complete. You can also scan only the parts of your system that contain installed applications to find and remove unwanted applications and harmful items on your computer more efficiently.
To scan your computer, follow these instructions:
- Open Salt Internet Security from the Windows Start menu.
- If you want to optimize how the manual scanning scans your computer, select Viruses and Threats > Settings.
- In Settings, select Scanning settings.
- Select Scan only file types that commonly contain harmful code (faster) if you do not want to scan all files. The files with the following extensions are examples of file types that are scanned when you select this option: com, doc, dot, exe, htm , ini, jar, pdf, scr, wma, xml, zip.
- Select Scan inside compressed files to scan files that are inside compressed archive files, for example zip files. Scanning inside compressed files makes the scanning slower. Leave the option unchecked to scan the archive file but not the files that are inside it.
- Select OK to close the Settings window.
- On the main view of the product, select Viruses and Threats.
- On the Viruses and Threats view, select either Quick scan or Full computer scan.
- Quick scan scans only the parts of your system that contain installed applications and then locations where viruses are commonly found, including your document folders. It can find and remove unwanted applications and harmful items on your computer in a shorter time.
- Full computer scan scans all internal and external hard drives for viruses, spyware, and potentially unwanted applications. It also checks for items that are possibly hidden by a rootkit. The full computer scan can take a long time to complete. The scan starts.
- If the scan finds any harmful items, it shows you the list of harmful items that it detected.
- Click the detected item to choose how you want to handle the harmful content.
Option Description Clean up Clean the files automatically. Files that cannot be cleaned are quarantined. Quarantine Store the files in a safe place where they cannot spread or harm your computer. Delete Permanently remove the files from your computer. Skip Do nothing for now and leave the files on your computer. Exclude Allow the application to run and exclude it from future scans. - Note: Some options are not available for all harmful item types.
- Select Handle all to start the cleaning process.
- The scan shows the final results and the number of harmful items that were cleaned.
Note: The scan may require that you restart your computer to complete the cleaning process. If the cleaning requires a computer restart, select Restart to finish cleaning harmful items and restart your computer.
How do I scan in Windows Explorer?
You can scan disks, folders, and files for harmful files and unwanted applications in Windows Explorer.
If you are suspicious of certain files on your computer, you can scan only those files or folders. These scans will finish a lot quicker than a scan of your whole computer. For example, when you connect an external hard drive or USB flash drive to your computer, you can scan it to make sure that they do not contain any harmful files.
To scan a disk, folder, or file:
- Right-click the disk, folder, or file you want to scan.
- From the right-click menu, select Scan for viruses.
The virus scan starts and scans the disk, folder, or file that you selected.
The virus scan guides you through the cleaning stages if it finds harmful files or unwanted applications during the scan.
How do I schedule scans?
Set your computer to scan and remove viruses and other harmful applications automatically when you do not use it, or set the scan to run periodically to make sure that your computer is clean.
To schedule a scan:
- Open Salt Internet Security from the Windows Start menu.
- On the main view, select Viruses & Threats.
- On the Viruses and Threats view, select Settings.
- Select Scanning settings.
- Select Edit settings.
Note: You need administrative rights to change the settings. - Turn on Scheduled scanning.
- In Perform scan, select how often you want to scan your computer automatically.
Option Description Daily Scan your computer every day. Every week Scan your computer on selected days of the week. Select the weekday from the list. Every four weeks Scan your computer on a selected weekday at four-week intervals. Select the weekday from the list. The scan starts on the next occurrence of the selected weekday. - In Start time, select when the scheduled scan starts.
- Select Run scanning with low priority to make the scheduled scan interfere less with other activities on the computer. Running the scan with low priority takes longer to complete.
- Select Scan only file types that commonly contain harmful code (faster) if you do not want to scan all files.
The files with the following extensions are examples of file types that are scanned when you select this option: com, doc, dot, exe, htm, ini, jar, pdf, scr, wma, xml, zip. - Select Scan inside compressed files to scan files that are inside compressed archive files, for example zip files. Scanning inside compressed files makes the scanning slower. Leave the option unchecked to scan the archive file but not the files that are inside it.
Note: Scheduled scans are cancelled when gaming mode is on. When you turn gaming mode off, they run according to the schedule again.
How do I view excluded applications?
You can view applications that you have excluded from scanning, and remove them from the excluded items list if you want to scan them in the future.
If the product detects a potentially unwanted application that you know to be safe or spyware that you need to keep on your computer to use some other application, you can exclude it from scanning so that the product does not warn you about it anymore.
Note: If the application behaves like a virus or other harmful application, it cannot be excluded.
To view the applications that are excluded from scanning:
- Open Salt Internet Security from the Windows Start menu.
- On the main view, select Viruses & Threats.
- On the Viruses and Threats view, select App and file control.
Note: You need administrative rights to access these settings. - Select the Excluded tab.
This view shows you a list of excluded files and folders. - If you want to scan the excluded application again:
- Select the application that you want to include in the scan.
- Click Remove.
New applications appear on the exclusion list only after you exclude them during scanning and cannot be added to the exclusion list directly.
How do I view and restore quarantined items?
You can view more information on items placed in quarantine.
Quarantine is a safe repository for files that may be harmful. The product can place both harmful items and potentially unwanted applications in quarantine to make them harmless. You can restore applications or files from quarantine later if you need them. If you do not need a quarantined item, you can delete it. Deleting an item in quarantine removes it permanently from your computer.
To view information on items placed in quarantine:
- Open Salt Internet Security from the Windows Start menu.
- On the main view, select Viruses & Threats.
- On the Viruses and Threats view, select App and file control.
Note: You need administrative rights to access these settings. - Select the Quarantined tab.
This list shows you the name, date of detection, and infection type for each quarantined item. - Double-click a quarantined item to see more information.
For single items, this shows you the original location of the quarantined item.
You can restore the quarantined items that you need.
You can restore applications or files from quarantine if you need them. Do not restore any items from quarantine unless you are sure that items pose no threat. Restored items move back to the original location on your computer.
To restore quarantined items:
- Open Salt Internet Security from the Windows Start menu.
- On the main view, select Viruses & Threats.
- On the Viruses and Threats view, select App and file control.
Note: You need administrative rights to access these settings. - Select the Quarantined tab.
- Select the quarantined item that you want to restore.
- Click Allow.
- Click Yes to confirm that you want to restore the quarantined item.
The selected item is automatically restored to its original location. Depending on the type of infection, the item may be excluded from future scans.
Note: To view all the currently excluded files and applications, select the Excluded tab in the App and file control view.
How do I exclude files or folders from scanning?
You can exclude files or folders from scanning so they are not scanned for harmful content.
To leave out files or folders from scanning:
- Open Salt Internet Security from the Windows Start menu.
- On the main view, select Viruses & Threats.
- On the Viruses and Threats view, select App and file control.
Note: You need administrative rights to access these settings. - Select the Excluded tab. This view shows you a list of excluded files and folders.
- Select Add new.
- Select the file or folder that you do not want to include in scans.
- Select OK.
The selected files or folders are left out from the future scans.
How do I block harmful websites?
Browsing Protection blocks the access to harmful websites when it is turned on.
To make sure that Browsing Protection is on:
- Open Salt Internet Security from the Windows Start menu.
- On the main view, select Secure Browsing & Banking.
- On the Secure Browsing & Banking view, select Settings.
- Select Edit settings.
Note: You need administrative rights to change the settings. - Turn on Browsing Protection.
- If your browser is open, restart your browser to apply the changed settings.
Note: Browsing Protection requires that the Browsing Protection extension is turned on in the web browser that you use.
How do I allow and block specific websites?
The website exceptions list shows specific websites that are either allowed or blocked.
You may manually block specific websites which you think are harmful, or allow automatically blocked websites if you are sure they are safe.
To view and edit website exceptions:
- Open Salt Internet Security from the Windows Start menu.
- On the main view, select Secure Browsing & Banking.
- On the Secure Browsing & Banking view, select Manage allowed and blocked websites.
Note: You need administrative rights to change the settings. - To add a new website on either of the lists:
- Select the Allowed tab if you want to allow a website, or the Blocked tab if you want to block a website.
- Select Add new to add the new website to the list.
- Enter the address of the website you want to add, then select OK.
The website is now listed as an allowed or blocked website.
To remove an allowed or blocked website from the list, first select the website you want to remove and then select Remove.
Deepguard
What is DeepGuard?
DeepGuard monitors applications to detect potentially harmful changes to the system.
DeepGuard makes sure that you use only safe applications. The safety of an application is verified from the trusted cloud service. If the safety of an application cannot be verified, DeepGuard starts to monitor the application behavior.
DeepGuard blocks new and undiscovered Trojans, worms, exploits, and other harmful applications that try to make changes to your computer, and prevents suspicious applications from accessing the internet.
Potentially harmful system changes that DeepGuard detects include:
- system setting (Windows registry) changes;
- attempts to turn off important system programs, for example, security programs like this product;
- attempts to edit important system files.
To make sure that DeepGuard is active:
- Open Salt Internet Security from the Windows Start menu.
- On the main view, select Viruses & Threats.
- On the Viruses and Threats view, select Settings.
- Select Edit settings.
- Turn on DeepGuard.
When DeepGuard is on, it automatically blocks applications that try to make potentially harmful changes to the system.
How do I allow applications DeepGuard has blocked?
You can control which applications DeepGuard allows and blocks.
Sometimes DeepGuard may block a safe application from running, even if you want to use the application and know it to be safe. This happens because the application tries to make system changes that might be potentially harmful. You may also have unintentionally blocked the application when a DeepGuard pop-up has been shown.
To allow the application that DeepGuard has blocked:
- Open Salt Internet Security from the Windows Start menu.
- On the main view, select Viruses & Threats.
- On the Viruses and Threats view, select App and file control.
Note: You need administrative rights to access these settings. - Select the Blocked tab. This shows you a list of the applications that DeepGuard has blocked.
- Find the application that you want to allow and select Allow.
- Select Yes to confirm that you want to allow the application.
The selected application is added to the Excluded list, and DeepGuard allows the application to make system changes again.
Ransomware protection
How do I use ransomware protection?
Ransomware Protection monitors a set of folders for potentially harmful changes made by ransomware or other, similar harmful software.
Ransomware is harmful software that encrypts important files on your computer, preventing you from accessing them. Criminals demand a ransom to restore your files, but there are no guarantees you would ever get your personal data back even if you choose to pay.
Ransomware Protection only allows safe applications to access the protected folders. The product notifies you if any unsafe application tries to access a protected folder. If you know and trust the application, you can allow it to access the folder. Ransomware protection also lets DeepGuard use its list of protected folders for an additional layer of protection.
You can choose which folders require an additional layer of protection against destructive software, such as ransomware.
Note: You must turn on DeepGuard to use Ransomware Protection.
To manage your protected folders:
- Open Salt Internet Security from the Windows Start menu.
- On the main view, select Viruses & Threats.
- On the Viruses and Threats view, select Settings. 4
- Turn on Ransomware Protection.
- Select View protected folders.
- Select the Protected tab.
This shows you a list of all currently protected folders. - Add or remove folders as needed.
To add a new protected folder:- Click Add new.
- Select the folder that you want to protect.
- Click Select folder.
To remove a folder: - Select the folder on the list.
- Click Remove.
Tip: Click Restore defaults if you want to undo any changes that you have made to the list of protected folders since installing the product.
How do I use Tamper Protection?
Tamper protection prevents harmful applications from shutting down the core security processes of the product.
Tamper protection protects the installed security product and its services, processes, files, and registry entries against changes or any controlling attempts.
- Open Salt Internet Security from the Windows Start menu.
- On the main view, select Viruses & Threats.
- On the Viruses and Threats view, select Settings.
- Turn on Tamper protection.
How do I use AMSI integration to identify script-based attacks?
Antimalware Scan Interface (AMSI) is a Microsoft Windows component that allows the deeper inspection of built-in scripting services.
Advanced malware uses scripts that are disguised or encrypted to avoid traditional methods of scanning. Such malware is often loaded directly into memory, so it does not use any files on the device.
AMSI is an interface that applications and services that are running on Windows can use to send scanning requests to the antimalware product installed on the computer. This provides additional protection against harmful software that uses scripts or macros on core Windows components, such as PowerShell and Office365, or other applications to evade detection.
To turn on AMSI integration in the product:
- Open Salt Internet Security from the Windows Start menu.
- On the main view, select Viruses & Threats.
- On the Viruses and Threats view, select Settings.
- Select Edit settings.
Note: You need administrative rights to change the settings. - Turn on Antimalware Scan Interface (AMSI).
The product now notifies you of any harmful content that AMSI detects, and logs those detections in the event history.
Banking Protection
How do I turn on banking protection (e-banking)?
When Banking Protection is turned on, your online banking sessions and transactions are protected.
When you access your bank's website or make online payments, Banking Protection activates and blocks all connections that are not necessary for online banking so that they cannot interfere with your confidential transactions.
To turn on Banking Protection:
- Open Salt Internet Security from the Windows Start menu.
- On the main view, select Secure Browsing & Banking.
- On the Secure Browsing & Banking view, select Settings.
- Select Edit settings.
Note: You need administrative rights to change the settings. - Turn on Banking Protection.
- To adjust the Banking Protection settings:
- Clear Disconnect untrusted apps if you do not want Banking Protection to close your already open connections. If you leave the setting selected, Banking Protection closes your current internet connections except for trusted apps when it activates.
- If you have to use an external tool that is being blocked during your Banking Protection session, clear Disconnect command-line and scripting tools.
Note: We recommend that you keep this setting selected unless it is absolutely necessary, as some malware attacks can use built-in Windows components, such as PowerShell, to gain access to your banking credentials and personal information. - Choose how you want Banking Protection to handle data that has been copied to your clipboard. By default, Clear the clipboard is selected and Banking Protection clears all data from the clipboard to protect your privacy when your Banking Protection session ends.
Clear this setting if you do not want Banking Protection to clear your clipboard. - By default, remote access to your device is blocked during your banking session. Banking transactions are always private and confidential, and you should never log in to your online bank if someone has remote access to your device.
Important: Do not clear the Block remote access during banking session setting on anyone's request unless you know both the person requesting the access and the exact purpose of the request.
Note: Banking Protection requires that the Browsing Protection extension is turned on in the web browser that you use.